LCD 8840 – Integration unit

LCD 8840 is a complete unit for integration in dental units. LCD 8840 is an LED lamp with an extremely powerful output at 1250 mW/cm2 and between 450 and 490 nm.

The technology in the LCD 8840 prevents the formation of gaps between the composite and the dentine/enamel during the curing process and after

LCD 8840 – Integration unit

Item number 02-12992

The LCD 8840 is a complete unit for integration in dental units. The LCD 8840 is an curing light LED lamp with an extremely powerful output at 1250 mW/cm2 and between 450 and 490 nm.

The technology in the LCD 8840 prevents the formation of gaps between the composite and the dentine/enamel during the curing process and after.
It is not possible to apply LED technology without a cooling system, if you want to ensure a constant output.
ATE Medico’s LED handpiece has a completely noiseless cooling system – not even a whisper – 0 dB!

ATE Medico’s design is characterised by simple solutions:

  • There is only one button on the handpiece to start the curing cycle.
  • There are three curing cycles. ATE Medico’s standard cycle is a “soft start” cycle which runs for 50 seconds. For the first 30 seconds of the cycle the output is low and then increases to maximum power for the remaining 20 seconds.
  • The operator can stop and restart the cycle at any time by pressing the same button on the handpiece.
  • The handpiece can easily be dismantled from the cable.
  • There is no complicated programming.
  • No upgrades are required.

No light guide: We have chosen to place the light source right at the end of the handpiece in order to avoid transmission loss. A removable lens at the end of the handpiece covers the light source.

Hygiene has always been a problem in connection with curing lights and it still is. Therefore, we have designed a special transparent disposable cover in a super soft material to be pulled over the handpiece and part of the cable. The cover provides optimal light transmission in the blue wavelength range and is comfortable for both operator and patient. Even the patient can’t fail to notice the hygiene aspect of this accessory.

The handpiece is provided with operating voltage via a super-flexible silicone cable.

The LCD 8840 is an integration model.

Technical information

ATEMedico’s LED curing light – for integration in dental units

Diameter of handpiece: 16mm

Length: 155 mm

Weight (handpiece): 105g

Lens size: 12mm diameter

Total output: 1250 mW

Power supply dimensions: 38 x 25 x 120
mm (no cooling required)

Connecting ATEMedico’s LED handpiece to a Dental unit

1. Building the LCD 88 and LCD 89 into your unit

The power supply can be either glued or screwed into the unit, wherever there is an appropriate space. The connection is 15 – 24V AC/DC. The start/stop function is normally operated via the switch on the handpiece. Therefore, no further connection is necessary.

2. Start/stop with a foot pedal
If you wish to operate the curing light via a foot pedal, an opto-coupler can be integrated between the outlet from the power supply and the cable plug on the handpiece cable.

The part number for the opto-coupler is 02-12940. It can be activated by 10 – 24 V and polarity is not relevant. Due to the fact that it is difficult to move the foot switch quickly, it will only be possible to use the handpiece’s first program (cycle 1). See the article on composite curing under the individual curing lights.

The curing light’s three programmes
Handpiece Button:
Press the button and hold it down. The light output will be weak as long as the button is held down. This light is used to position the curing light over the working area (pilot light). When you release the button, the lamp will automatically switch to cycle 1.

Cycle 1: Press the button once. This will start a 50-second cycle. The output during the first 30 seconds of the cycle will be 100 mW/cm2 or less. The output will increase to maximum power for the remaining 20 seconds*.

Cycle 2: Press the button twice within the space of one second for a 20-second cycle. The light output will be weak for a couple of seconds and will then switch to maximum power.

Cycle 3: Press the button three times for a cycle of 40 seconds. The lamp runs at reduced power (approx. 70% output). The lamp can be switched off at any time during the curing cycle by pressing the button.When the lamp is on the yellow diode will blink.

3. Connecting the handpiece to another manufacturer’s power supply.

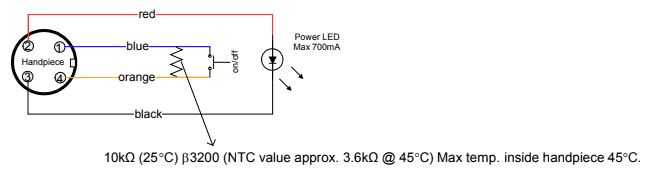
The diode must be driven by a constant current generator. If you wish to reduce the light output, the current must be regulated by pulse width modulations (PWM) at a high frequency (e.g. 1 KHz).
1. Cable 1. Blue Start/stop and NTC resistor
2. Red Anode diode
3. Black Cathode diode
4. Orange Start/stop and NTC resisto

Technical information – Expanded

We use cookies, and we hope it is ok with you  Learn more