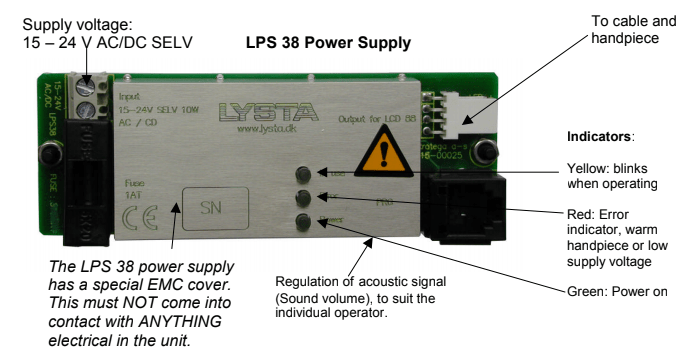
The power supply can be either glued or screwed into the unit, wherever there is an appropriate space. The connection is 15 – 24V AC/DC.
The start/stop function is normally operated via the switch on the handpiece. Therefore, no further connection is necessary.
2. Start/stop with a foot pedal
If you wish to operate the curing light via a foot pedal, an opto-coupler can be integrated between the outlet from the power supply and the cable plug on the handpiece cable. The part number for the opto-coupler is 02-12940. It can be activated by 10 – 24 V and polarity is not relevant.
Due to the fact that it is difficult to move the foot switch quickly, it will only be possible to use the handpiece’s first program (cycle 1). See the article on composite curing under the individual curing lights.
The curing light’s three programmes: Handpiece:
Press the button and hold it down. The light output will be weak as long as the button is held down. This light is used to position the curing light over the working area (pilot light). When you release the button, the lamp will automatically switch to cycle 1.
Cycle 1: Press the button once. This will start a 50-second cycle. The output during the first 30 seconds of the cycle will be 100 mW/cm2 or less. The output will increase to maximum power for the remaining 20 seconds*.
Cycle 2: Press the button twice within the space of one second for a 20-second cycle. The light output will be weak for a couple of seconds and will then switch to maximum power.
Cycle 3: Press the button three times for a cycle of 40 seconds. The lamp runs at reduced power (approx. 70% output). The lamp can be switched off at any time during the curing cycle by pressing the button. When the lamp is on the yellow diode will blink.

The diode must be driven by a constant current generator. If you wish to reduce the light output, the current must be regulated by pulse width modulations (PWM) at a high frequency (e.g. 1 KHz).
1. Cable 1. Blue Start/stop and NTC resistor
2. Red Anode diode
3. Black Cathode diode
4. Orange Start/stop and NTC resistor
3. Connecting the handpiece to another manufacturer’s power supply


